WINDOWS: How to mount an existing volume disk to your computer
INTRODUCTION
With the coming Windows 10 support expiring on October 14th, many will be left with a decision either to stay in Windows 10 (with paid support), upgrade their hardware to Windows 11, or ditch the windows ecosystem entirely. For most, the easiest solution is really just to jump into Windows 11 with new hardware. Problem solved…
Well, not quite… More than likely you have files and data that you want to carry over to your new hardware. In this particular content that I am providing, it is a guide to mount a hard drive to your new computer, more specifically your server or desktop. While the guide is intended for more technical people, anyone intending to learn or DIY this process can obviously do so. The Windows environment, that you will be in, included in this guide, is a how to navigate through the command prompt (all text) in safe mode without a graphical user interface (GUI) in order to mount the hard drive correctly.
If you’ve ever researched computer related documentation more often than not, the intended audience are computer people, where my intention is to make this sort of stuff more accessible. You can always have it in your back pocket for future reference.
DISCLAIMER
The information provided here was from using the standard google search with Gemini. Although it did provide the correct and appropriate information, they do not detail out each step for a general audience (or possibly because my search query was just specific to the topic).
I don’t want to scare you but do I want to point out that this process is very critical as it can wipe out your system and data! One wrong letter, space, etc can wipe out a drive. With that being said, I made this guide to be a great point of reference not only for myself and you. While I pride myself in being able to detailing out the steps, it would behoove you to consider researching the materials further before engaging in this activity. I also recommend backing up your drives before jumping head first into using the command prompt. Make sure that you are absolutely confident on moving to the next steps. Now that I got the scary stuff out of the way and it is actually pretty easy… Let’s begin!
ENVIRONMENT
This guide assumes the HARD DRIVE is already connected to your computer.
The environment is in the command prompt safe mode on a Windows 7 Home edition or newer. The graphical user interface (GUI) for mounting disks and partitions are disabled so they only way to do it is via the command prompt.
STEPS
- Check to see that the physical drives are being detected by the operating system
wmic diskdrive get model,index,serialNumber
-
Type:
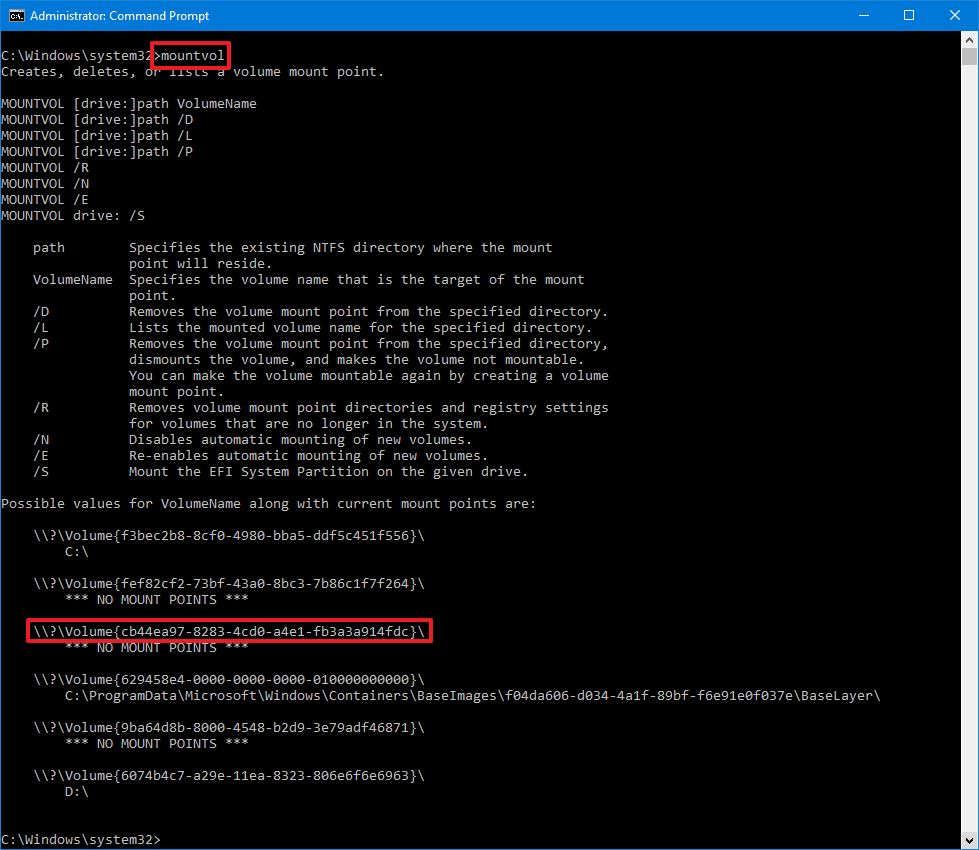
mountvol: to list all the volumes that are connected to your computer. You will see a list with labels like this:
\\?\Volume{ab123c4d-3243-56e7-fg89-9947f54658a6}\
C:\-
The drives that you connected earlier, will be listed but will be labeled
with
*** NO MOUNT POINTS ***. You will seeC:\, typically the system itself, and you could have several different letters (depending on the number of drives you have attached) or folder paths as your mount points, or in other words, where you access the volume from the operating system. -
To mount the desired volume (drive) the command is
mountvol <mountpoint> <Volume, ID>, so the command will look something like this:mountvol E: \\?\Volume{ab123c4d-3243-56e7-fg89-9947f54658a6}\.
-
Make sure to use the ID of the volume you want to mount labeled
*** NO MOUNT POINTS ***that was listed for you when you typedmountvolby itself. Make sure to pick a mountpoint letter that is NOT CURRENTLY BEING USED.
-
Type
mountvolagain to confirm that your volume has been mounted. Your volume should be mounted successfully!


Comments
Post a Comment